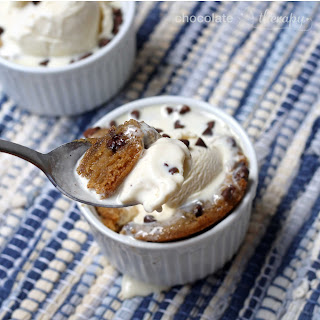
Allow me to introduce you to one of my favorite desserts: the pizookie. It'll be your favorite, too.
I've been making these since college, but I guess I've been holding out on sharing them. The concept is about as simple as it gets. You put cookie dough into a ramekin. Bake it until it's just starting to brown on the top. Pull it out of the oven, and put a big scoop of ice cream on top.
The next few minutes are pure bliss. The cold ice cream combines with the warm cookies. Everything is melting together. Your mind goes blank. You're not sure if you've ever had anything so good in your life, etc.
This is the easiest thing on my blog. You can use homemade cookie dough if you have time -- I have in the past -- but Tollhouse and Pillsbury are in every grocery store for a reason. They save you time and they've spent decades perfecting the recipes. These pictures are made with Tollhouse and Turkey Hill French Vanilla.
I gave my roommate and longtime #1 recipe taste-tester the extra pizookie after taking pictures. She's had them multiple times since I make these any time I'm tasked with dessert and don't feel like baking before dinner. After we finished them (mine was already half gone from taking pictures), she confessed that even though she knew these were easy, she thinks they're the best thing I make. I can't really take credit for store-bought cookie dough and ice cream, but seriously...they might be.
I have only tried pizookies with variations of chocolate chip cookie dough. I also prefer them with vanilla ice cream (probably the only time plain vanilla is my preference) or cookie dough if I'm really feeling the cookie vibe. There are an endless number of potential combinations. I'm sure they're all great.
You can make this in any ramekins you have around the house. You will need to adjust the amount of cookie dough you add and cooking time based on your choice. The amounts I've detailed below are guidelines based on the ramekin size I was using. You can adjust the recipe based on the number of servings and the ramekin size. I usually fill them a little over half full if I'm using smaller ramekins (4-6oz). The key is to cook them until each pot is just slightly starting to brown around the edges. The top will be set, but it's still soft in the middle.
Enjoy!
Pizookies
Serves: 4
Total Time: 15 Minutes (3 Active)
Ingredients
16oz Chocolate Chip Cookie Dough
4 Scoops Vanilla Ice Cream
Instructions
Preheat oven to 350 degrees. Fill each ramekin with approximately 4oz of cookie dough (cookie dough should be about 1-inch deep in the ramekin). Place on cookie sheet. Bake the cookie sheet of ramekins on the middle rack for 12-16 minutes*, or until cookie dough is just starting to brown around the edges and the top is set. Do not overbake! Cookies will be cooked through, but the inside should still be soft.
Remove from oven, let sit for two minutes, and top each ramekin with a cold scoop of ice cream, pressing down slightly in the center. The ice cream will start melting right away, so DIG IN! Make sure not to hold the ramekins without a napkin or something to prevent you from burning your hands (since this would really cut down on the enjoyment factor).
*Time range varies based on ramekins used, amount of dough added, and oven.
And since I was going to eat the pizookie anyways, I documented:
 | ||||
| Immediately after dropping ice cream on the pizookie. |
 |
| Eating and photographing. Photographing and eating. |
 |
| And then all the bites start looking like chocolate chip cookie dough ice cream, which is never a bad thing. |
 |
| Perfection. (Put down the camera to focus on eating) |
 |
| And this is what it looks like if you don't eat it right away. |


